
X-Rays
Overview
X-rays are one of the most widely used imaging tools in clinical medicine. First discovered in 1895 by Wilhelm Röntgen, X- rays revolutionized diagnostics by allowing physicians to see inside the human body without surgery. More than a century later, X-rays remain the first-line imaging study for countless conditions.
Their speed, availability, and low cost have made them the imaging study of choice in many settings. Whether it be in a bustling emergency department, a family physician’s office, or a military field clinic, X-rays provide real-time insight into what’s happening inside the body. They help clinicians confirm diagnoses, monitor disease progression, and guide interventions, all while minimizing invasiveness.
The Flashlight Analogy: How X-rays Create Images
Imagine shining a very strong flashlight through your hand and viewing the shadow on a wall. While you can't see inside your hand, the shadow shows the outline of your bones. X-rays work on a similar principle. Instead of visible light, they use invisible, high-energy electromagnetic radiation called X-rays.
As X-rays pass through the body, different tissues absorb different amounts of radiation:
-
Bone absorbs the most and appears white on the image.
-
Soft tissues like muscle absorb some and appear in shades of gray.
-
Air absorbs the least, allowing more X-rays to pass through and appear black on the image.
This difference in absorption creates patterns on the detector, resulting in a black and white image with varying shades. These images help us see inside the body without making an incision, which is why X-rays are a fundamental tool in medicine.
How X-rays Are Produced
Inside the X-ray machine is a sealed glass tube that creates X-rays through a series of carefully controlled steps. Before walking through the process, it's helpful to understand the key parts of this system.
Key Parts of an X-Ray Machine:
-
Filament (Cathode: negative terminal): A coiled tungsten wire that heats up to release electrons.
-
Anode (positive terminal, the "target"): A rotating or stationary tungsten disc where electrons hit to produce X-rays.
-
Glass Tube: A vacuum-sealed glass tube housing the filament and anode "target", through which electrons are able to travel freely at very high speeds from the cathode to the anode without resistance.
-
High-Voltage Supply: Creates the large voltage difference between cathode and anode, accelerating electrons. This voltage difference creates an electric field, where negative charges like electrons are strongly attracted to the positive anode terminal.
-
Collimators: Adjustable metal filters that narrow and direct the X-ray beam. You can imagine it like putting a paper towel tube over a flashlight, which narrows and focuses the light beam. Collimators work in a similar manner by absorbing rogue X-ray beams that are not going in the intended direction.
-
Protective Lead Housing: Encloses the tube to absorb radiation, ensuring that it only passes through the intended channel (collimators). Due to its high atomic number, lead is very good at absorbing X-rays, ensuring that X-rays only go where they are meant to go. The protective lead house contains the glass tube and has circulating oil to keep it cool. It has a small opening where the collimators are present, ensuring that X-rays are emitted in a precise, predictable direction towards the patient.
-
Patient: X-rays enter the patient and are either absorbed, deflected, or allowed to pass through. The degree of absorption is based on the density of the tissue through which the X-rays are passing.
-
Detector (X-ray plate): Captures the X-rays that exit the patient and converts them into an image.
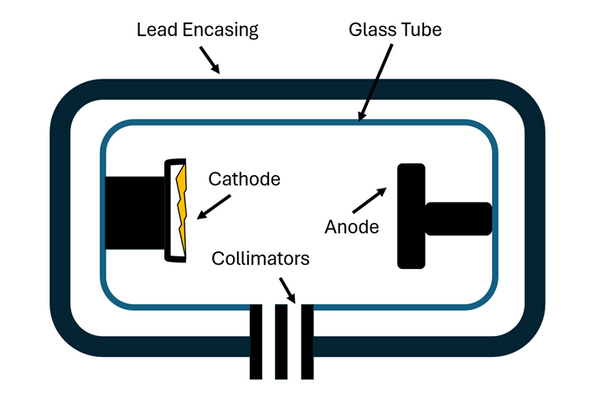
Figure 1: X-ray Tube and Lead Housing Unit
Here’s what happens step-by-step:
1. The Filament:
A small wire made of tungsten (a metal chosen because it can withstand very high temperatures without melting) is heated. This process is called thermionic emission, which means the filament gives off electrons when it becomes hot.
2. Electron Acceleration:
A strong electrical field is established by the high voltage supply between the strongly negative cathode (tungsten filament) and positive anode (target). This electrical field exerts an electrical force on the electrons released by the cathode within the glass vacuum tube from the cathode to the anode. This force accelerates the electrons toward the tungsten target disk (anode). Because the electrons are accelerating in a vacuum tube in the absence of air friction, they achieve very high speeds before they impact the anode.
3. X-ray Generation:
When these high-velocity electrons hit the metal target, their energy is converted into two things: X-rays and heat. The X-rays are released in all directions from the site of impact of the electron with the target. The oil circulating around the glass tube absorbs the heat, ensuring that the tube does not overheat.
4. Shaping the Beam:
-
The X-rays produced by the impact of the electron and the target anode travel in all directions, similar to light from a bulb. The lead encasing around the glass tube absorbs X-rays that are not travelling towards its small opening. X-rays that travel through its small opening are further filtered using collimators (metal filters) that absorb X-rays that are not travelling in a plane of motion in line with the intended target body part.
5. Patient:
The X-rays that pass through the collimator are directed toward the specific body part being examined. As they travel through the body, different tissues absorb or allow the X-rays to pass through them to varying degrees. Dense tissues like bone absorb a large portion of the X-rays due to their high atomic number and density. Soft tissues such as muscle and fat absorb less, allowing more X-rays to pass through. Air-filled spaces, like the lungs, absorb very little, allowing most of the X-rays to continue through the body. This selective absorption is a key principle in how X-rays interact with the human body.
6. Detection:
After passing through the body, the remaining X-rays reach a detector plate positioned on the opposite side of the patient. This detector captures the X-rays that were not absorbed by the body’s tissues. The detector is made of materials that convert the incoming X-ray energy into electrical signals. These signals are then processed by a computer and translated into a digital image. The varying amounts of X-rays received by different areas of the detector correspond to differences in tissue absorption, allowing the system to reconstruct an internal view of the body’s structures in a digital format.
-
Dense structures like bones absorb most of the X-rays, meaning fewer X-rays reach the detector behind them. These areas register as bright or white on the digital image.
-
Soft tissues, such as muscle or fat, absorb less radiation, allowing more X-rays to reach the detector; these areas appear in shades of gray.
-
Air-filled spaces, like the lungs, absorb very little X-ray radiation, so a large amount reaches the detector, producing dark or black regions on the image.
This variation in absorption is what creates the contrast that allows us to visualize internal anatomy on an X-ray.
Historical Point: In the past, the detector was a sheet of film that had to be chemically developed. Today, it's usually a digital plate that instantly turns the X-rays into an image displayed on a screen. This transition from film to digital has made X-rays faster, safer, and easier to store or share.
Indications and Categories of Radiographic Examinations
Clinical Indications for Radiographic Imaging
Radiography is indicated for a broad range of diagnostic purposes, including:
-
Evaluation of skeletal trauma (fractures, dislocations, bony lesions)
-
Detection of pulmonary pathology (e.g., pneumonia, pneumothorax, pleural effusion)
-
Identification of foreign bodies (radiopaque materials)
-
Assessment of degenerative or inflammatory joint disease
-
Investigation of gastrointestinal or genitourinary abnormalities
-
Surveillance or staging of neoplastic processes
Major Radiographic Modalities
-
Chest Radiograph (CXR): Standard for pulmonary, cardiac, and mediastinal evaluation.
-
Abdominal Radiograph (AXR): Useful for detecting obstruction, perforation, or abnormal calcifications.
-
Skeletal Surveys: Applied to assess extremities, axial skeleton, or full-body imaging in cases of trauma or systemic pathology.
-
Dental and Panoramic Radiographs: Evaluate dental structures, maxillofacial bones.
-
Mammography: Specialized technique for breast tissue imaging using lower-energy X-rays.
-
Fluoroscopy: Real-time dynamic radiographic technique employed for procedures like contrast studies and catheter guidance.
Descriptive Terms in X-Ray Interpretation
-
Radiodensity: The ability of a substance to block X-rays. Radiodense structures appear white (e.g., bone).
-
Radiolucent: Allows X-rays to pass through; appears dark (e.g., air in lungs).
-
Contrast Media: Substances like barium or iodine that enhance visibility of internal structures.
-
Opacity/Opacification: Appears white; may represent fluid, consolidation, or mass.
-
Lucency: Appears dark; indicates gas or air.
-
Sclerosis: Increased bone density; white and hardened appearance.
-
Lytic Lesion: Area of bone destruction; appears dark.
-
Calcification: Dense white areas due to calcium deposits.
-
Underpenetration: Image too white; poor visualization of structures.
-
Overpenetration: Image too dark; may obscure subtle findings.
-
Artifact: Any non-anatomic feature on the image, e.g., jewelry or motion blur.
Positioning
Proper positioning is crucial for accurate diagnosis and image interpretation.
-
PA (Posteroanterior): X-rays pass from back to front. Standard for chest imaging.
-
AP (Anteroposterior): Used when patients are bedridden; can exaggerate heart size.
-
Lateral: Side view; helps localize pathology in three dimensions.
-
Oblique: Angled projection; used to separate overlapping structures.
-
Supine, Erect, Decubitus: Body positions that influence how structures appear.
Click here for a more detailed overview of positioning with images
References 1.Dental X-Ray Tube. X-ray tubes: Key components and operations in radiography. https://www.dentalx-raytube.com/news/x-ray-tubes-key-components-and-operations-in-radiography/ 2.Webb, S. X-ray production and image formation [PDF]. University of Michigan. https://websites.umich.edu/~ners580/ners-bioe_481/lectures/pdfs/Webb_chpt-2s5.pdf 3.Radiopaedia. X-ray tube. https://radiopaedia.org/articles/x-ray-tube-1 4.Radiopaedia. Beam collimators. https://radiopaedia.org/articles/beam-collimators 5.Radiopaedia. X-ray production. https://radiopaedia.org/articles/x-ray-production-2 6.American College of Radiology. Appropriateness criteria. https://www.acr.org/Clinical-Resources/Clinical-Tools-and-Reference/Appropriateness-Criteria 7.PocketHealth. What’s in my X-ray report? Decoding common terminology. https://www.pockethealth.com/patient-resources/whats-in-my-x-ray-report-decoding-common-terminology/ 8.MedSchool. Assessing the quality of a chest X-ray film. https://medschool.co/tests/chest-xray/assess-quality-of-film